Saturday, December 31, 2011

mug rugs

I went a little mug rug crazy for Christmas this year. I've been seeing them on creative blogs and I just needed to make some... and then give them to people.
disappearing nine patch mug rugs

One of the nice things about making mug rugs, is that since they are small, you can FINISH them! Yay. I got to practice quilting techniques in a manageable, and fun way. Pattern picking, cutting, piecing, sewing, cutting and piecing some more, machine quilting and binding.
snowflake mug rugs

Plus, I even practiced making bias tape to go with some of them, and I know I'll be making and using my own bias tape in the future as well. My cousin got some as a gift, as well, and we will use it one of these sewing Sundays, I know we will!
crazy mug rugs
 Now, if I can just get the hang of adding photos again... (took some major experimentation to get these in...)

Thursday, July 14, 2011

A Different Creativity

I'm working on a web page. Createlivity posts will be made there, and I've got the first one up. If you would like to take a look, here it is. There is not much there, yet. I've been rather timid about making it, if I must admit to that. Still, every step is a learning process, and I'm still learning about it. Be glad there is not a camera watching me, as the faces - and the language - not good.

It is a learning process, though, and I've learned that it takes a little time, and I have to give myself permission to experiment with it, let it rest, and learn from my mistakes as well as my successes. Feedback would be oh-so-much appreciated, though (she says bravely, figuring she doesn't have enough readers to worry about trolling ).

Tuesday, June 21, 2011

putting it all together


I looked at the blocks today, and spread them out to see which should go where. It was pretty simple, actually, I just tried not to get the same fabric facing itself on any neighboring block. Then I put out more of the coppery blocks as corners. Then I got one row sashed. I should remember that there are times that I'm a very linear thinker, and so, since I grabbed the bottom row first, it is now, by virtue of the sashing I did, the top row. Oh well.

Here's how it looks now. I was rather log cabin building in adding the sashing, but I think it worked all right. I don't know if you can tell with the photos, but there are ink issues, left over from measuring and marking.

Monday, June 20, 2011

More log cabins

Well, not really more squares, but I sewed more strips on the squares I have. In fact, I'm to the point where I don't have a complete set of strips left for the squares I have. I don't know how big Mom intended these squares to be, but I know I don't have enough strips for that. Not nearly enough. By at least 2 strips per block that I've put together, and I only used about half the centers she cut. So... now the further decision making.

My first thought is to just stop where I am, or at most add enough strips to make an even set out of the strips I have left. Just keep the blocks as a they are what they are project, which is pretty much what I intended for them to be. Except that I want to finish them into something useful. Three by six squares could probably be worked into a baby quilt or something.I'll frame them to even things up, and I'm thinking that if I orient them all the same way, then it won't be so noticeable that they aren't "finished" squares. Will it? I mean, I probably wouldn't notice, looking at someone else's finished piece, but will it just cause someone else to have the heebie jeebies or something?

So, for the rest of the project, I think I probably have fabric I can repurpose for a backing, and some batting as well, especially if it is baby quilt size. I think I'll incorporate the leftover "center" pieces into the sashing, if there are enough of them to work with, and I think there are. I'll get to try out my new bias tape foot for the binding, and the free motion foot for the quilting. Sweet, huh.

Well, no pictures today, but if I lay out the blocks tomorrow and add sashing, I'll be sure to show it off.

Sunday, June 19, 2011

Log Cabin Quilt Blocks


I've been going through things in my craft room, trying to organize and simplify them. There is a lot of stuff being stored in there right now, and if it wasn't, crafting would be oh so much easier. That said, some of the things I find aren't easy to find (emotionally) and then aren't easy to know what to do with.

Generally, I'm getting to a place where deciding whether to let go is getting easier. Still, yesterday, I found several sets of quilt block pieces that my mom had cut out. Not enough for a whole quilt. At least not a whole quilt with any one of the blocks. I know I could talk a lot right now about my mom, and her love of crafting, and making things. I could go on and on about how diabetes took her eyesight, and how much that sucked. And it did. Instead, I'm going to talk about a journey I took, today.

I started with a decision. am I going to keep this project or get rid of it. I'm sure I could find someone, somewhere who would be ecstatic to receive these pre-cut pieces. I'm still working on that decision on some of the squares. But, I decided to sew these up. Roxanne and I have been building some quilt blocks of our own, so these didn't seem too far away from that. The centers for all theses blocks is some coppery squares, then there are strips of (mostly) flowers. I put them on the table with my sewing machine thinking... hmmmm log cabin quilt. I know how that works. I'll arrange the strips by length and go to town. And so it started. I had enough short strips for 18 blocks. There were more squares, and I'll figure out what to do with those some time.

I wondered briefly what my mom's plan for them had been, and then decided that I just needed to move along. The next few strips went on fairly randomly, mostly alternating dark then light. That really wasn't so esthetically pleasing though as I would have liked. Now, I'll be working through 2 darks and 2 lights. I've learned some about this quilting process, even with such a basic task. I'm not sure I think these blocks are pretty, but I certainly think the finished product could be useful. I'm still not sure what that finished project will be. It won't be whatever Mom had in mind, but perhaps it won't be so far off, either.

By the time I had ironed my last square for the day, I felt like I had dipped into a hope chest from my mother, and found the hope, still there, waiting for me.

Saturday, June 11, 2011

Hand Dyed Yarn


I like to visit the Farmer's Market this time of year, to pick up fresh produce, especially tomatoes. This morning, I happened upon a woman and her spinning wheel. Cool, huh. She had a few skeins of hand dyed sock yarn that was really beautiful. I picked up the blue one and didn't put it down. Now, it is mine, all mine, and I guess I'll have to get out the knitting needles for another pair of socks!

Sunday, June 5, 2011

Shelbi Fashion Show


About a month ago - while school was still in, and finals were approaching - the craft blogs I look at had a week of sewing for kids, and showing off what was made. It wasn't a good time for me, although Roxanne and I could have whipped something out. We had other things on our plates. This week, while Shelbi has been visiting, we worked on some clothes for her to take home. Like most families, new clothes that parents don't have to pay and arm and a leg for are welcome. She got to help in the designing of them, and Roxanne and I got to sew some cute girlie clothes. It is a win all around.

At Joann's, Shelbi and I found some cute summery fabrics on the sale racks. She picked out what she liked, and I bought 4 yards of fabric, some cute decorative buttons, and elastic. At home, I cut out some simple shapes: an A-line skirt, a tiered skirt, a peasant top (the pattern even has the sleeves attached) and a top that has the bodice gathered into a neckband that also serves as shoulders. I also found a piece of fabric that I repurposed to a little dress, and enough leftover from a t-shirt I was making for myself to cut out one for her as well.

There were only a couple of issues that we had to correct. First the lime green top was just too long. Easy enough to shorten. Shelbi had picked out some fun buttons to embellish with, and the finished top is cute and summery. The other problem was the t-shirt. The fabric is soft, and stretchy, and the neckline turned out to be WAY too big. Our fix? We threaded a short piece of elastic through the turned neckline hem and gathered it a little in the center front and center back. I think it turned out really well.

Friday, April 22, 2011

shell and jacket


Thanks to the long weekend, Roxanne and I got to sew early this week. We got a lot done, today. It was nice to get to catch up, after last weekend, when she was gone for a conference. We enjoyed our time, and put it to good use, which is fortunate as we will have to miss next weekend. She's coming up on the end of her semester. Mine is a few weeks away, still, but I can feel the downhill slide.

Tenna Kay really liked the shell and jacket we worked on last time. She liked them so much that she wore them this week. She decided no buttons on the jacket, but we did put darts in the back of both to improve the fit. I think we done good on 'em. She wore the jacket with the blue top and skirt we made earlier.

I think the pattern is interesting as there is a dart that comes from the armhole. I rather like the way that places the dart, which seems good placement for Tenna Kay, and for me too. I've made myself this jacket, but instead of a shell, I made a sleeveless dress that matched. I was going to add a picture of me in the dress, but... um... well, no. At least not the picture I found.

It is nice to be able to sew some for her, and that has been a special gift for Roxanne and I to give her mom.

Sunday, March 27, 2011

A New Outfit


Today, Roxanne and I finished two pieces for her mom. The skirt is knit, I'm not sure where it's from, and the top is cotton. I had some ideas for some clothes a couple of years ago, and they never came together. The two fabrics look like they were made to go together, though, don't they.

The skirt is a pretty basic A-line, elastic waist skirt. The top was from a new pattern that both Roxanne and I wanted to try. We almost had to scrap it and start over. Yeah. Mistakes were made. Still, the finished product looks pretty nice. The top has a nice almost princess seaming and a little bit of a cap shoulder, both of which I like. It fits nicely, and has a zipper opening in the side seam. Not sure how much I would like that, but it is a rather fitted top. We added facing at the neck (instead of binding) and next time will probably do the same for the arm openings along the top.

I cut out a pair of shorts for Raine, and another shell top and short sleeved jacket for Roxanne's mom. We'll get those sewed up, plus another shirt for Carl next week, if all goes as planned.

Friday, March 11, 2011

overalls revisited


I got my overalls finished in time to wear them to the steampunk convention, which I've been blogging about all week, one way or another. I did promise to talk about my "finished" overalls though, so I will. I think the outfit in general worked well, except for the accessories. I found a pattern for crocheted cogs that I think would be fun to add on the bib. It will be kind of a feminine touch, as well as steampunky and fun.

I wrapped a washer and a nut in copper wire for the buttons and then used a bead to sew through to hold them on. I didn't want to sew them on too tight, since the overall buckle had to go around, and I used a heavy weight thread for strength. We'll see with use how well it wears, as there may be some rubbing. The camera didn't like the shiny metal much and all the pictures I took of them were blurry.

I need modify the straps and narrow them a little so they fit in the buckles a little better but they did ok for the convention.

One of the modifications I made on the pants to turn them into overalls was putting a band around the waist, and then attaching the straps and the bib to that. It worked well, and neatly. I decided I didn't really need to button them up tighter than that, and since there wasn't a gap on the sides like in other overalls, nothing was going to show. Later on, I can add that if I decide to, but I think what would really work well is a leather belt. I can hang pouches or vials, or even a holster from it, and I think that would go a long way towards steaming them up.

Now I want to make so many other steampunk outfits though! I even realized on the way home, that the bunnies I've made in their very gathered skirts could - with very little modification - be very steampunk. Leather! I need leather!

Thursday, March 10, 2011

Tam O'Shanter


I crocheted this hat for my trip to Old Tucson for the Wild Wild West Steampunk Convention. I found the pattern here, and improvised. The pattern was for a certain yarn company, and didn't indicate yardage or weight for the type of yarn they recommended beyond spools of silk. They recommended 4 spools. The pattern also did not mention a size for the crochet hook.

I went to Hobby Lobby and picked out a silk/bamboo thread which just felt yummy. I'm sure it is a heavier thread than the silk they worked with, but I picked from what was there, and the silk/bamboo just felt right. I went home and picked a size D hook from my stash, and went to work on the hat.

Most of the hat is worked in double crochet, and I worked fairly tightly because I wanted it to be dense. I followed the pattern and I am pretty happy with the size, although I suspect with the yarn I used, it is larger than the ones originally made. That being said, there were two basic places that my hat is different than the pattern. The first is that I made the head opening smaller, only by about 2 rows, but also with decreases in those two rows. Then I didn't continue the band as far as the pattern said. I think I did 10 rows, and the pattern said 15. I ended up using 4 spools of the silk/bamboo. Huh. Go figure.

I enjoyed wearing the hat, and it has enough brim to keep the sun out of my eyes, at least somewhat. It isn't heavy enough to be hot, and I didn't even get horrible hat hair. I will probably decorate it a little, when I find something I like, and something steam punky. I decided no pom-pom, though.

Tuesday, March 1, 2011

funky fun backpacks

One of the projects Roxanne and I finished recently were some backpacks we were putting together for some of the little boys running around in the family. When we made clothes for them last summer, we used the legs of some of Carl's discarded pants to cut some shorts out of. The nice worn soft denim of the lower legs seemed like it should be good for some shorts and it was. The pants were cargo pants, and they had big pockets on the legs that had flap closures.

We looked at them once, and we looked at them twice, and we cut them out of the pants thinking, man, we ought to be able to make backpacks for the kids out of those! They got set aside for a while, but finally, we got some strapping to sew on. I edged around the pockets with the serger to kind of finish the cut edges. Roxanne sewed on the straps, and they were done!

Her grandson LOVED his, and was thrilled at the prospect of sharing the others with his cousins.

Sunday, February 13, 2011

overalls


Next month, Ron and I will be attending a Steampunk convention in Arizona. It will be held at Old Tucson, and I think that is pretty much a perfect venue. There are many interesting sounding events, and we think it is going to be fun. So, now, to get ready, I'm creating my Steampunk garb.

The idea of garb creation is not new to me, having been a long-time SCA participant, but the styles for Steampunk are not recreated from the middle ages. More like, the American Civil War, but not. I've thought about possibilities long and hard, trying to find something that would fit me. Not only physically fit me, but also fit _me_. So, trollop, as ubiquitous as that may be in Steampunk, is out. I am so NOT that - and the thought of that outfit with me in it? Well, I wouldn't want to go there, or see anyone equivalent, either. What else, then? I looked around for inspiriation, and finally got some... overalls, with a loose shirt underneath.

So, today, I'm talking about repurposing a pattern, instead of some fabric. I looked through my patterns to see what I could use to make overalls. This one, from the '70's seemed to fit the bill. I found some dark green denim to make them out of, and last weekend, during the weather, I cut them out. I cut a simple square for a bib (OK, actually two, one to line the other) and strips for the shoulders. I think I will finish the top edge all the way around with a waistband type piece that will incorporate the bib and the back of the shoulder straps. Then, I'll fold over a bit of the waistband on each side and put a buttonhole in. Then, I got an inspiration to use a combination of washer and nut to make my buttons. I'm pretty proud of that one, as I think it will be very Steampunkish.

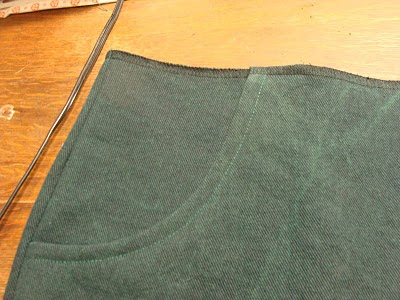
I also have pockets! See how nice they look? Ooooo pockets.... I'll update you when they are done, and let you know how they turn out!

Monday, January 31, 2011

Kitty Skirt


I'm not into high fashion. I have enjoyed Project Runway, although I'm a late convert and have only been hooked for about 2 and a half seasons. I have a little more appreciation for "fashion forward" but it isn't MY sensibility. I like comfortable. I like coverage. I like fun.

When Roxanne and I were looking through the fabric stash, we came across a fabric that I had gotten with something for Raine in my mind. It never got made. The fabric was black on black cats. The background is a very deep black, and the cats a tiny bit lighter. There was also a pretty good sized piece of solid black, about the shade of the cats. How fun it would be, we thought, to cut skirts out of both, then cut the panels in half and alternate them.

It turned out that there was only enough cat fabric for one skirt, and since Roxanne wears skirts more often than I do, she got it. Since it still sounded like fun, I went on the lookout for another black on black print, and when the cotton wall went on sale a couple of weeks ago, I picked up a print that was little curlicues. Not as fun as the kitties, but...

This weekend, we got my skirt finished. Those skirts are very simple to make. Here is a close-up of the kitty fabric, and Roxanne's skirt. Look close on the right side of the picture.

Sunday, January 30, 2011

tribal tunics


Roxanne and I got to sew today. Yay! I even remembered my camera. More Yay! Here's hoping my memory stays and the sinus infection continues to leave.

This is fabric Carl picked up when a local quilting shop closed. It must have been pretty cheap, because he got a bunch of it. Like 10 yards. Yeah. It feels almost canvas-y, a loose weave, but is softer and more pliable than canvas. It also has shells sewn onto it, as you can tell in the close-up. We all agreed it was cool fabric... but what to do with it?

It sat in my stash for 2 years... or maybe more than that. This year, one of my sewing goals is to make Carl some shirts. He could use them, and hey, what's a sister for? He remembered this tribal fabric, and we pulled it out and looked at it again. After some discussion of what he would like made, it seemed like a tunic just made sense. Something you can pull on over whatever when the weather is cold.

Roxanne and I talked about the shells, and finally gave ourselves permission to just cut off the ones that were in the way. We could go crazy trying to "save" them. Later on, after wearing, any that turn out to be in an uncomfortable spot will also be cut off. Roxanne save the shells, threatening to string them together for a necklace.

Thursday, January 20, 2011

Maybe

I think, now that they have been posted, that I should have allotted a post for each of the garments. Perhaps if the pictures had turned out better, I would have done that. Explained a little more about the provenance of the fabric, the pattern, the wardrobe plan... something. The pictures would have enhanced the thoughtfulness of both the blog, and the reader.

Or maybe I'm just looking for inspiration.

Monday, January 17, 2011

With a little help from my phone


I forgot the camera. Again. I did remember my daughter, and her bag of goodies to keep her occupied, and the fabric, sundries, and sewing machines. Even the goodies for lunch. The camera? No. So I used my phone and took some photos anyway. Here's some of what we've been up to in the past few weeks... (pause while I load up the photos, so I know what to talk about when...)

Wow, these photos are either too small to see, or, when enlarged, too blurry. Sigh. I'll talk about them anyway. This first one is Roxanne, in her new black slacks and purple top. The fabrick for both pieces was repurposed from mystery fabric. Meaning I'm not even sure where it came from. Maybe I should call that rediscovered fabric.

This skirt is really cute - just in case you can't tell... We found a couple of yards of this black kitties on black background fabric. Very fun. Then, we had the brainstorm of combining it with some black fabric, alternating panels for a skirt. We were hoping there was enough of the kitty fabric for two skirts, but we only got one. Still we liked the alternating panel idea enough that when the calico fabric went on sale this weekend, I picked up some in a different black on black pattern. (no more kitties to be had)

The final photo is Roxanne's son, Casey, in a tunic that we made for him. The fabric is rather canvas-y with a tribal kind of design on it, and shells (yes, shells) sewn on here and there. We're making Carl a tunic out of it, but his isn't quite finished yet. Casey's took a little adjusting, but we got it finished this afternoon.

Sunday, January 2, 2011

With the promise of pictures soon...

Friday, Roxanne and I worked on refilling the basket of things-to-be-sewn-on-Sundays. It was fun to go through a portion of each of our stashes and the piles of patterns, and consider the possibilities. Then we pinned and cut and folded and repinned and not always in THAT order.

Cutting things out is not my favorite part of sewing, usually. I like to have a stack of things ready to grab and throw at the sewing machine. There have been many a production line at my house, I'll tell you. Still, playing with the fabric, and considering the possibilities IS fun, and we enjoyed it. We came up with a few fun outfits, and I'm happily awaiting their construction.

Today, for instance, while Roxanne did some (more) cutting, I worked on a sewing a top (one of the two pieces left in the basket from our summer cutting spree), a really cute skirt, some pants and another skirt for Roxanne's closet. All of those pieces are from fabric that has now been used instead of stored. Creatively envisioned into new purposes. They all have a place on this blog, and will be featured as soon as they are finished and photographed. In fact, there are several pieces in that basket that will find their way here, in the next few weeks.