Sunday, March 29, 2015

Fascinating

A few weeks ago, just before our trip to the Steampunk convention, Wild Wild West Con, in Tucson, I started crocheting some accessories. I got the idea for them from  a post my mother-in-law called my attention to, of someone crocheting around a button and making a flower. Cute. Easy. Colorful. Then my imagination took off!

My first effort at a clockwork flower.
I had bought a tube of clock gears at the first Wild Wild West Con, knowing I could use them somehow, someway.  They are various sizes, and some are fairly small, and some have stems on one side or the other, so they can actually be kind of pokey. But I took the basic idea of crocheting around a button, and crocheted around one of the bigger gears instead. It was button sized, more or less. I used crochet cotton thread, and attached some smaller gears around the flower as well.

Well, my imagination went off!  It was pretty easy, as I had several colors of thread, and that tube of gears. But then I wanted more than just gears, so my friend Sara and I took a trip to Hobby Lobby, and I picked up some steampunkish bits and pieces, and continued crocheting.

Of course Sara got one...
By the time of the convention, I had a ziploc bag of them, and gave a few away, and wore one on my hat band. I put them on clips which seems to be handy for clipping to a pocket or hat band as well as your hair. Here are the ones I still have:

the finished and the unfinished
As you can see, I didn't just use gears for the middle of the fascinators. I found some metal buttons that seemed to work well, and even a little lock trinket. Ultimately, I liked a flower pattern with more that the five original petals, but I tried a variety of configurations. They reminded me of the snowflakes I crocheted oh-so-many-years-ago. For something quick and really pretty easy, I think they worked out well.

Are they steampunk? Well, I like them to be so my answer is yes. Not everyone may agree, and that is OK. What makes something steampunk? Well, it is Victorian (which crochet is), and whimsical, and something of a mixture of hard (like gears or skeleton keys) and soft. These were definitely fun!

Thursday, March 26, 2015

OMG So Cute Crocheted Doll!

I went into my local Jo-Ann's last weekend, and glanced briefly through their selection of crafty books. Little did I know that I would come across this:
Oh so full of cuteness and ideas... even a penguin!
I bought it.

I had a coupon to help out, but I bought it.  Then, I started searching for yarn, and hooks, and trying it out. I mean who wouldn't want one of these?
I know! Right? Want!
Hmmm, a couple of issues. The author is evidently British, and their crochet stitches are named a little differently than ours. The book does have the "translations" though, and I could handle it, but it may not be for everyone. My bigger issue is with gauge.  This author does not use any of the weights for any of her yarns, and the blends are not familiar to me either (OK, I admit it, I do most of my yarn buying at Hobby Lobby, and it is acrylic. But why would I use some fancy, expensive yarn to try out a pattern for the first time? Also, I didn't find any indication of scale in the book. How big - or small - are these dolls?  At any rate, I tried out a regular skein and a very small hook and this happened:
Turned out OK, I think. 
Then I went on to the legs and torso, and finally the arms. She went from here to there

and then finally, I got the arms added. The ruler should give you some idea of the scale.
The doll in one piece
Of course, she still needs hair. The plan is to use the same yarn that I used for her scalp. Good idea to create a hair-colored scalp. The over-all instructions (once the translation is taken into account) were easy.  It says to work in spirals, however, and when one does that, the end of the rows migrate, so that my reducing rows - worked according to the pattern - are in the middle of the chest and back instead of along the sides as I'm sure the author intended. Next time, I'll modify accordingly. I managed to make ankles, if you notice. Since there are socks, shoes and boots in the patterns, I think they will come in handy. I'm really looking forward to stitching up some clothes for this cutie, and the book has quite a few clothing and accessory patterns to try out. Did I mention the penguin? And a teddy bear...


Tuesday, March 17, 2015

More weekend creations - freezer paper bleach resist dying

For Raine's birthday, my brother Carl made some awesome shirts for her. OK, he didn't really make the shirts, he decorated them. Expressly to her taste. Awesomely. She has been watching anime series on Netflix, and Soul Eater has been one of her favorites.

What a cool Birthday present!
He used a resist dying technique with bleach, and on Saturday, he came over and we both worked on shirts.

The first step is to decide on a designe, and make a pattern on freezer paper.  Having just returned from Wild Wild West Con, I was in steampunk mode and wanted gears. Ron found a gear stencil for me to use, and my first pattern looked like this:
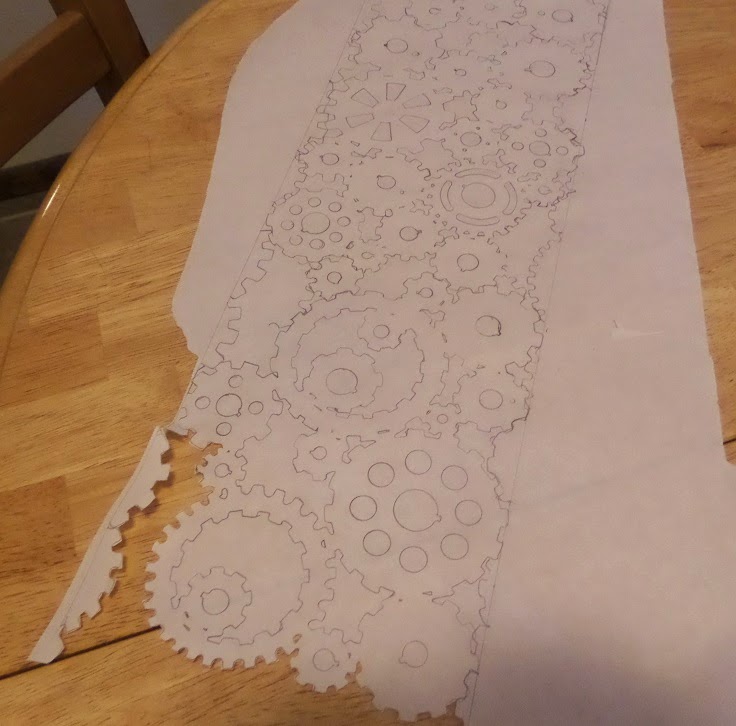
busy busy busy
I gave up on cutting that out pretty quickly, as you can tell. The border wasn't going to work well as I had done it, and the more I looked at it, the more I felt like the number of gears was just going to end up looking muddy. So I started again.

Once you get the design onto the butcher paper, and you have cut out the parts that you want to apply the bleach to, you iron it on to the shirt.  100% cotton works best, but Carl used a shirt that wasn't. I don't know if it was because of the fiber content or what, but it was really difficult to tell whether the color was changing when he was bleaching it, but it came out like this, so you know it worked.

thundercats are cool
When you bleach them, you use a 50-50 solution of bleach and water, and Carl had a very small spray bottle. You want to be able to control where the bleach is going You also want to cover as much of the area you don't want to bleach as possible. Oh yeah, and don't forget to put a layer of cardboard between the front and back layers of the shirt. You don't want the bleach to bleed through.

Carl did some fiddly bits on his other shirt, with Mr Mets on it. I think it came out really well!

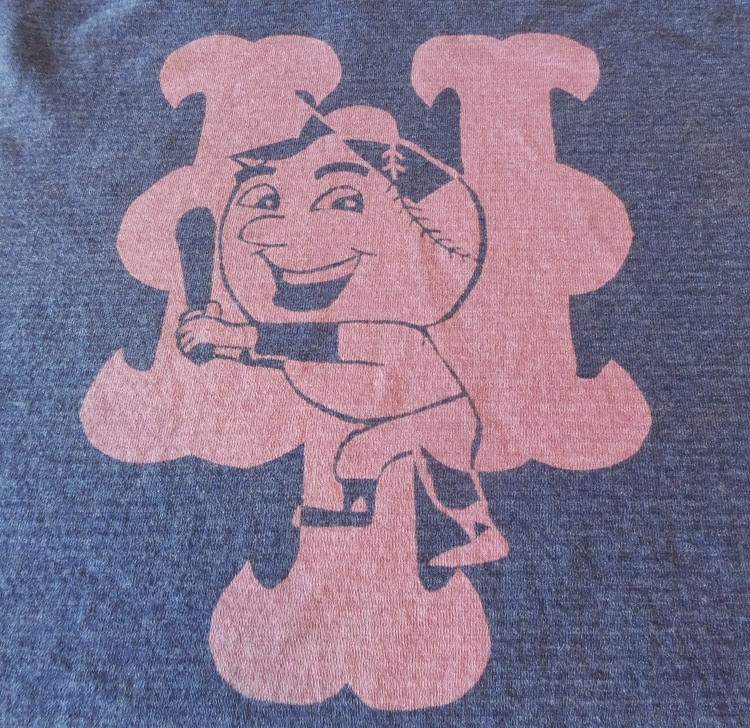
A sports team shirt for Fridays where he works.
Check out the small lines he had to make and how neatly he did it! Not sure I have the patience or the steady hand necessary for that fine work.

Once you spray on some bleach, you blot it off with some paper towels (Doesn't hurt to wear protective gloves for the spraying process). Spray bleach and blot 3 or 4 times, as your fabric and design seem to need. Then, dunk the shirt in water, to get the bleach out. You don't really want it sitting on the shirt too long. After the sink rinse, throw them in the washer for a wash and dry.

I am happy with how my gears came out, though. My second attempt was much more managable, and the stencil was really useful for making the border once I figured out how I should do that.

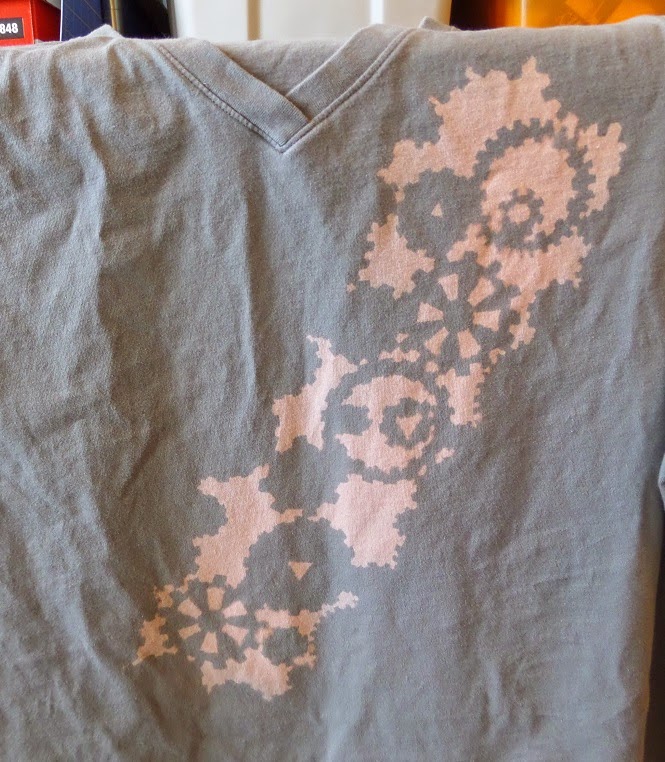
can't stop my clockwork heart...
I have a feeling I'll be trying out this technique again. Soon.


Sunday, March 15, 2015

Crafterday

Saturday was a very crafty day for me this past week.  It started in the morning with a pancake breakfast supporting our local victims assistance unit. Then a trip to Hobby Lobby with my cousin, and sewing partner, Roxanne. She had been in ill health and unable to sew with me for over a year, but has improved to the point where we have been able to sew occasionally. It has been mostly fairly "light duty" for the most part, only an hour or two. This week we got in a good bit of time, though.

It wasn't all spent sitting at the sewing machines. We were planning and plotting (replotting?) a project that had been set aside for a while. We had been working on quilt squares before she became so ill. A quilt for each of us, in fact, using the same basic block, although the execution of each quilt may be different when it comes to block placement and use of sashing. We pulled out the bag of fabrics, blocks ready to piece together, and blocks that have been pieced.

stack of quilt blocks

It had been so long that we had to figure out sizes of finished quilts again, and numbers of blocks for finished quilts. There were enough blocks cut out that we could piece a set together, though, at least!

newly constructed

We wrote things down this time, and hopefully put them where they will be referred to when needed. It felt good to refresh ourselves on this project, and feel like we could make some progress on it. I'm happy to report that the block pattern we picked is still pleasing to us both. Yay! We even discussed possible quilting designs for the finished quilts. Even though the blocks will be the same pattern for both, the finished quilts will not be identical. They will each have our person stamp on them, from layout to backing to quilting. And they will always make us think of the other. What treasure!