Thursday, March 26, 2015

OMG So Cute Crocheted Doll!

I went into my local Jo-Ann's last weekend, and glanced briefly through their selection of crafty books. Little did I know that I would come across this:
Oh so full of cuteness and ideas... even a penguin!
I bought it.

I had a coupon to help out, but I bought it.  Then, I started searching for yarn, and hooks, and trying it out. I mean who wouldn't want one of these?
I know! Right? Want!
Hmmm, a couple of issues. The author is evidently British, and their crochet stitches are named a little differently than ours. The book does have the "translations" though, and I could handle it, but it may not be for everyone. My bigger issue is with gauge.  This author does not use any of the weights for any of her yarns, and the blends are not familiar to me either (OK, I admit it, I do most of my yarn buying at Hobby Lobby, and it is acrylic. But why would I use some fancy, expensive yarn to try out a pattern for the first time? Also, I didn't find any indication of scale in the book. How big - or small - are these dolls?  At any rate, I tried out a regular skein and a very small hook and this happened:
Turned out OK, I think. 
Then I went on to the legs and torso, and finally the arms. She went from here to there

and then finally, I got the arms added. The ruler should give you some idea of the scale.
The doll in one piece
Of course, she still needs hair. The plan is to use the same yarn that I used for her scalp. Good idea to create a hair-colored scalp. The over-all instructions (once the translation is taken into account) were easy.  It says to work in spirals, however, and when one does that, the end of the rows migrate, so that my reducing rows - worked according to the pattern - are in the middle of the chest and back instead of along the sides as I'm sure the author intended. Next time, I'll modify accordingly. I managed to make ankles, if you notice. Since there are socks, shoes and boots in the patterns, I think they will come in handy. I'm really looking forward to stitching up some clothes for this cutie, and the book has quite a few clothing and accessory patterns to try out. Did I mention the penguin? And a teddy bear...


Tuesday, March 17, 2015

More weekend creations - freezer paper bleach resist dying

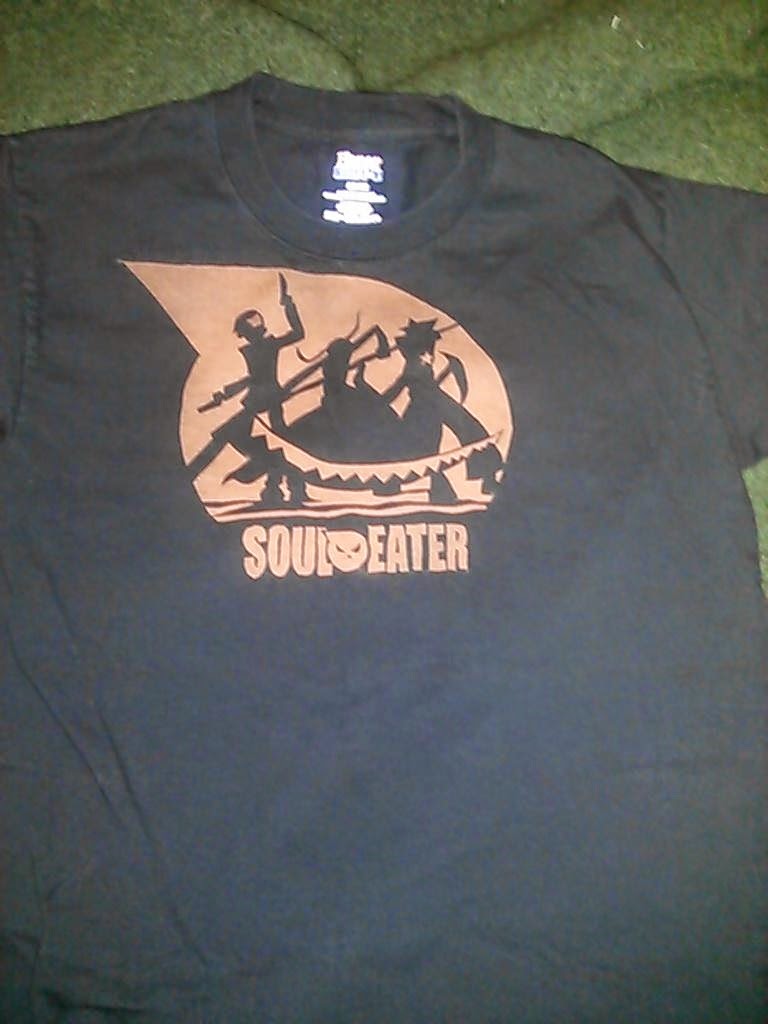
For Raine's birthday, my brother Carl made some awesome shirts for her. OK, he didn't really make the shirts, he decorated them. Expressly to her taste. Awesomely. She has been watching anime series on Netflix, and Soul Eater has been one of her favorites.

What a cool Birthday present!
He used a resist dying technique with bleach, and on Saturday, he came over and we both worked on shirts.

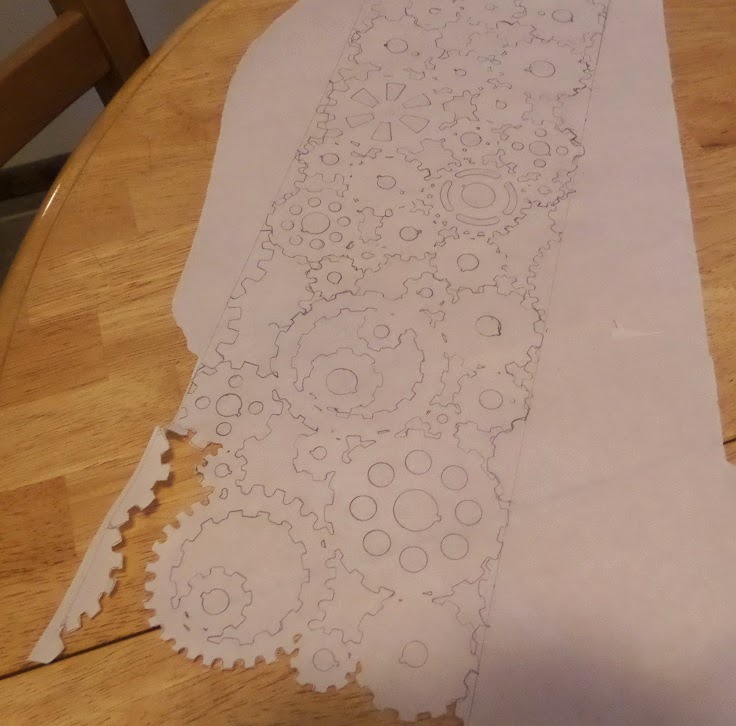
The first step is to decide on a designe, and make a pattern on freezer paper.  Having just returned from Wild Wild West Con, I was in steampunk mode and wanted gears. Ron found a gear stencil for me to use, and my first pattern looked like this:

busy busy busy
I gave up on cutting that out pretty quickly, as you can tell. The border wasn't going to work well as I had done it, and the more I looked at it, the more I felt like the number of gears was just going to end up looking muddy. So I started again.

Once you get the design onto the butcher paper, and you have cut out the parts that you want to apply the bleach to, you iron it on to the shirt.  100% cotton works best, but Carl used a shirt that wasn't. I don't know if it was because of the fiber content or what, but it was really difficult to tell whether the color was changing when he was bleaching it, but it came out like this, so you know it worked.

thundercats are cool
When you bleach them, you use a 50-50 solution of bleach and water, and Carl had a very small spray bottle. You want to be able to control where the bleach is going You also want to cover as much of the area you don't want to bleach as possible. Oh yeah, and don't forget to put a layer of cardboard between the front and back layers of the shirt. You don't want the bleach to bleed through.

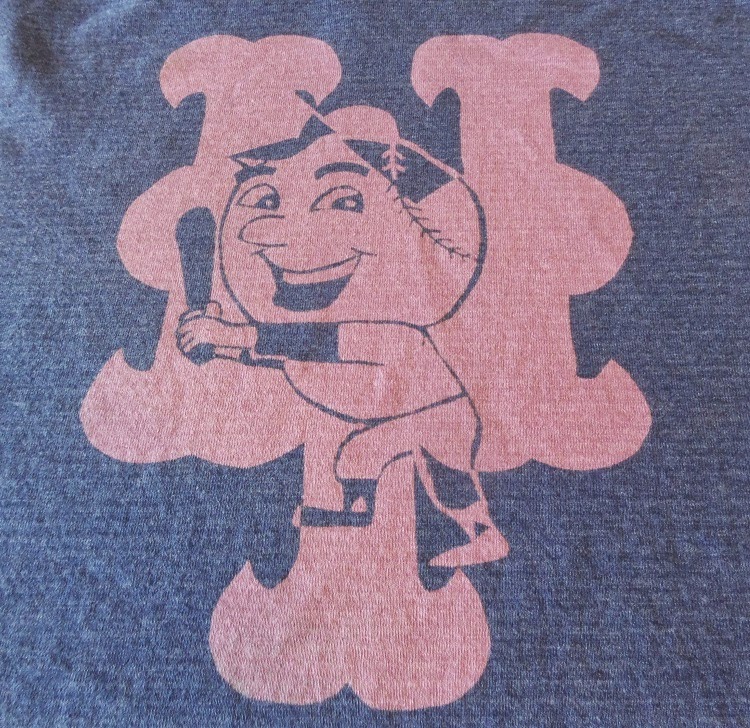
Carl did some fiddly bits on his other shirt, with Mr Mets on it. I think it came out really well!

A sports team shirt for Fridays where he works.
Check out the small lines he had to make and how neatly he did it! Not sure I have the patience or the steady hand necessary for that fine work.

Once you spray on some bleach, you blot it off with some paper towels (Doesn't hurt to wear protective gloves for the spraying process). Spray bleach and blot 3 or 4 times, as your fabric and design seem to need. Then, dunk the shirt in water, to get the bleach out. You don't really want it sitting on the shirt too long. After the sink rinse, throw them in the washer for a wash and dry.

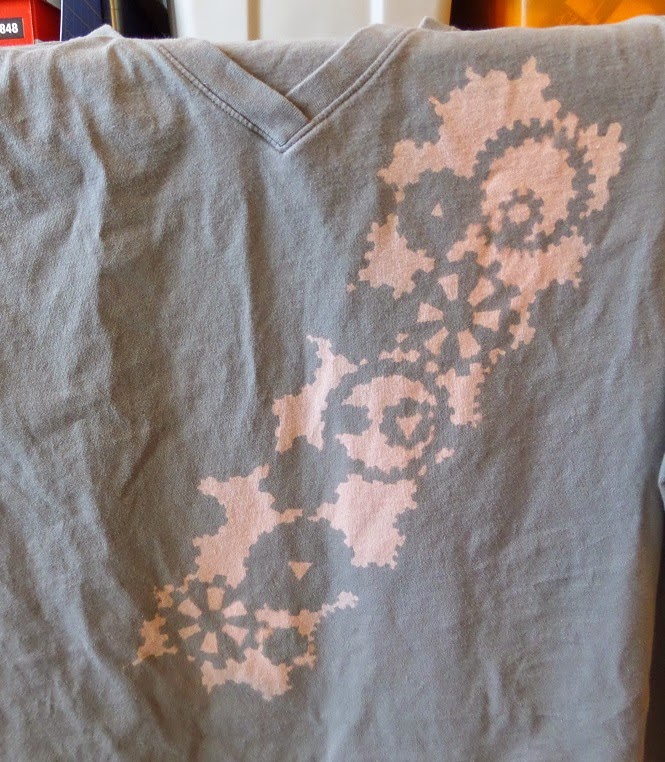
I am happy with how my gears came out, though. My second attempt was much more managable, and the stencil was really useful for making the border once I figured out how I should do that.

can't stop my clockwork heart...
I have a feeling I'll be trying out this technique again. Soon.


Sunday, March 15, 2015

Crafterday

Saturday was a very crafty day for me this past week.  It started in the morning with a pancake breakfast supporting our local victims assistance unit. Then a trip to Hobby Lobby with my cousin, and sewing partner, Roxanne. She had been in ill health and unable to sew with me for over a year, but has improved to the point where we have been able to sew occasionally. It has been mostly fairly "light duty" for the most part, only an hour or two. This week we got in a good bit of time, though.

It wasn't all spent sitting at the sewing machines. We were planning and plotting (replotting?) a project that had been set aside for a while. We had been working on quilt squares before she became so ill. A quilt for each of us, in fact, using the same basic block, although the execution of each quilt may be different when it comes to block placement and use of sashing. We pulled out the bag of fabrics, blocks ready to piece together, and blocks that have been pieced.

stack of quilt blocks

It had been so long that we had to figure out sizes of finished quilts again, and numbers of blocks for finished quilts. There were enough blocks cut out that we could piece a set together, though, at least!

newly constructed

We wrote things down this time, and hopefully put them where they will be referred to when needed. It felt good to refresh ourselves on this project, and feel like we could make some progress on it. I'm happy to report that the block pattern we picked is still pleasing to us both. Yay! We even discussed possible quilting designs for the finished quilts. Even though the blocks will be the same pattern for both, the finished quilts will not be identical. They will each have our person stamp on them, from layout to backing to quilting. And they will always make us think of the other. What treasure!


Saturday, February 21, 2015

Talking About Creativity - The Stash

Like many crafters, I have one. Bigger than some, smaller than others, but I think the stash is important to the creative process for me.

For one thing, I am not a "one project at a time" crafter. My least favorite part of sewing is cutting things out, so I will cut out several projects at once, and then work on them as my schedule allows. There are many times that I would not have done any sewing if I had to start the sewing session by cutting out the project (much less having to go shop to begin the project). When I want to sew, I want to SEW! Having a stash allows me to pick patterns and fabric that I have at home, and put them together when I'm ready. Having a stash of yarns and patterns also works well for me when I get that yen to crochet or knit. I can try out a pattern with yarn I all ready have, then decide if I need to buy yarn particularly for that project.

The stash also allows me to buy patterns and materials when they are on sale, for use later. I wouldn't always be able to sew what I wanted if I had to purchase all fabrics and patterns at full price. It certainly wouldn't make my project making any kind of bargain AT ALL, and likely put many projects out of my price range. I certainly wouldn't get to make all the things I've enjoyed making.

Besides allowing for purchase on sale, sew up later projects, I have had the opportunity to "aquire" fabrics and yarns. Estate sale purchases, inheritance, and "hey I have this fabric that I won't ever use" have all found their way into my house. I've washed and sorted, made some up and passed some along to others. Sure, the aquired fabrics are not always to my taste, but I've made and donated garments and blankets because the price for the materials was right: practically free.

Part of my stash of fabrics, yarns and other crafting supplies
Storing the stash can - of course - be another matter, and I have struggled with that at times. Right now, most of my stash is stored in bins, on shelves. The bins aren't particularly attractive, but they do provide a certain amount of protection from sun, dust, pets, etc that I appreciate. I can sort by type of fabric or yarn, and then dig through the appropriate bin when I'm shopping through my stash. Sometimes I am happy to find a fabric I had forgotten about, and sometimes just looking through a bin will be inspiration for a project. I don't think I will ever - at least not here in New Mexico - store my fabrics on shelves, no matter how pretty I think that might look, or how tempting. The thought of having to wash and rewash those fabrics before I can even cut them out? Well, once is enough in my book.

Stash as a creative element gives me amunition to be creative with
when the inspiration hits me, and I would be very sad to have to do without mine.

Monday, February 16, 2015

Works in Progress - February Edition

I usually show something that is finished, but I don't have anything finished to show off. I did hem some pants for Carl. While I know he appreciates that, it isn't really picture worthy.

I did a little sewing this weekend, but not as much as I would have liked. Roxanne was busy so we didn't get together to sew. I really love that she is healthy enough to join me for sewing again. The time we put in together, with our regular sewing sessions has really upped both of our skills. Funny thing about practice, huh. There are still new techniques we want to learn and try out, and I hope we will get to some of them this year.

I worked some on a nightgown that Roxanne wants. It is a nice long winter gown that we'll finish just in time for the weather to be too warm to wear it. Perfect timing again!

I have several tops that I have done some serger work on and pressing. They are ready for necklines and sleeve hems, but while I will serge them all with white thread, I will do the visible sewing with a matching color thread, so one at a time, in these cases. They are all tunic tops, which I love to wear, with neckline and dart placement variations. I seem to be attracted to greys with blues and greens lately, and this batch of tops really shows that. Plus I have another piece to cut out. Just trying to decide if I want button down or what for that top. Decisions, decisions.

We will be heading for Wild Wild West Con in a couple of weeks, and I still have some sewing to do for that. I don't know what it is, but I can get all Steampunk all over creatively for others, but when it comes to creating something for myself, I get stumped. Last year, I started a tulip skirt for myself, but even though it is a simple pattern, it wasn't coming together like I wanted it to. I put it down and left it alone for almost a year. Then a few weeks ago, I pulled it out, and decided what to do to fix it. Now the necessary taking apart part is done, and I have a plan to make it right. I even have a plan for some embellishment, which is kind of exciting for me. It is subtle, but I found some sew-on studs at Hobby Lobby, and picked them up on a whim. I think I will sew them on the skirt just above the seam where the flounce is attached near the bottom of the skirt. Kind of excited that I put them together, and I hope it turns out like I hope it will.

Other than that, I've been crocheting cute animal scarves still. Currently, I'm working on a panda. His little nose looks so cute! Can't wait to get the face made!

Observations: I like having multiple projects to work on. Of course some are projects I can pick up and put down easily (the crochet or other needlework), others I like to be able to sit down and have some sustained time to work on in good light (Not usually at night), I will also take on a challenge and try to solve it. Sometimes that last takes a while to rest from frustration, and allow myself time to think and be creative with a solution. Works in Progress.

Thursday, February 5, 2015

Sweet Dreams

I'm all fired up about posting more often, and after I wrote that last post, I had idea chasing idea through my little pea brain about things to post about. Even after I finally fell asleep, I dreamed about crafts to post about. Yep, I dreamed about writing a post about a craft that I did in my dreams. I don't know what to call the craft, or even how to do it in my waking life, but the glass looking disks that I made in my dream were sure pretty. And well worth posting about, you know, if they were actually real, and not a figment of my dreaming imagination.

Still, if you want to talk creative process, I think I would have to admit that dreaming is a part of mine. Then translating that dream into some sort of reality.

Lately, in my waking hours, I've been making scarves. They are fun scarves, made to look like various creatures. I got the patterns from Bees Knees Knitting, an Etsy shop. Someone showed me the patterns, and I could NOT resist. I bought all of the set. I made several for Christmas presents, like this snake.
there is a snake head with a little tongue even
I learned that all varigated yarn is not dyed the same, when I was making this snake. Still I think trading off on the yarn patterns is one of the things that Raine likes about it.

I made one for Ron
what DOES the fox say?
And I couldn't resist making a raccoon scarf for myself, even thoug wearing it around my neck all day won't happen very often.
much cooler than a real raccoon
The patterns are easy to follow, and pretty quick to make. I think I've made them all longer than the pattern calls for, but the bodies are pretty much "repeat these two rounds" until it is as long as you want it. I like the hanging from both shoulders look, so I lengthened. I think you could almost go stole or collar if you modified them well.

One thing that I like about them - besides the simple stitches - is that you put the faces on right away. So you get to look at those cute faces all while you are working on the less exciting long expanse of body. Motivation? Yes, it is.

I will probably, eventually, work my way through all the patterns. Right now, I'm working on a cat, and next up is a panda bear. Definitely a fun group of projects, for any level of crocheter. All you need is single and double crochet. Way to go, Bees Knees Knitting!

Sunday, February 1, 2015

The Good, The Bad, and the Blog

I haven't posted in a while. It isn't that I haven't been making things. I have. But that "showing off" really isn't my style in the long run. And that is what I feel I have basically been doing here. I'm not selling anything, and I'm not trying to. It is the creative process that I'm really interested in.

So, I've been thinking and rethinking, considering and reconsidering, where I want to go with my blogging. My basic idea is to record and to share my creative process, with the hopes of learning something about that process, of recording what I'm learning for myself - if no one else - and consider where my creative process hasbeen/is and where it might/should go next. What I want to move away from is the show and tell that I started with. It was what I wanted for a while, but not what I want/need now.

I hope that I can move on to finding some other creative process sharing bloggers, authors, artists, etc to inspire me on my journey as well.

So here is my starting place.  I'll start with a finish. I finished this camp shirt for my brother.
My latest finish
Earlier this fall, Carl picked out three fabrics for shirts for me to make for him. They were his birthday present, and this is the last one. I also added a Christmas shirt as well. All of the shirts were made from the same pattern, and old Butterick from I-don't-know-when - probably the 70's some time.
very useful camp shirt
 I can't tell you how many times I have made this pattern up. I've sewed them for myself, my Dad, and my brother. At least. Of all the patterns I've used, and all the garments I've made, this is the one I've made most often. I have 2 or three of them hanging in my closet now.

It is an easy shirt to make up, and before my mother died, she and I modified the pattern to make a bigger version to fit my large sized family. Of course I've modified for size many times since then, making it bigger, or longer, or shorter sleeved. Every time I pull out that stack of newsprint, I get to share a moment and a memory of my Mom, so I haven't been able to transfer it to something more "permanent" than the newsprint. Believe me when I say the newsprint is showing its age, too.
Mom's newprint resize

I've learned some sewing by making this shirt as well. I've tried several different ways to finish the front plackets, from folding over and letting the buttons and button holes hold everything in place (didn't like that), figuring out whether or not I need to use interfacing (depends on the weight of the fabric the shirt is made of - lighter fabric definitely needs interfacing heavier, not so much - and iron in which I also like to sew down to get it to stay in place). What I've found that makes me happiest is to sew that self facing flap down near the fold, and (with the raw edge turned under)
on the inside edge. I really think that helps the front of the garment hold its shape better especially after repeated washings, and then it doesn't need as much other attention.
sew it down. sew it ALL down.
What I HAVEN'T learned is how to get the collar placement down. OK, I "eyeball" a lot of sewing. Sleeve hems? Eyeball them. Patch pocket placement? Yep, that too. But the collar? I carefully find the center back of the collar, and the center back of the shirt, and line them up... and still this happens.
AAARRGGH!!!
Not too noticable once its being worn, because its meant to be open, and all. Still, you would think I could do better. Still trying.

Here's something I started doing recently, as I have noticed that sometimes my hems will turn up in the wash, and then not want to lie flat. After every washing they do it the same way, in the same place. So I've tried double stitching them. Now, to see how this wears...
Double stitched on the sleeve hem.
So, here is the first of my creative process, learning edition, posts. As always, feedback is appreciated. Thanks for reading.