Sunday, April 3, 2016

SNOWFLAKES!

Inspiration and Instructions
I'm making snowflakes. Can you tell? Do you love snowflake ornaments like I do? One year I made dozens, and gave them as gifts, and (of course) kept some too. Now, it's time to do it again.

I have some growing-up young people around, niece, friend's kids, my own kid, and I think about them getting out on their own and how long it took me to amass my favorite Christmas decorations, and how much I've enjoyed making many of them. So, I put two and two together, and thought, what a great gift! Handmade Christmas decorations to get them started when they may not have too much money to spend on them, but still like to be festive. I got a plastic shoebox for each kid, and I'm on my way to adding decorations to each.


One of the easiest - and quickest - are crocheted snowflakes. The last time I made snowflakes, I didn't have this booklet, so I thought it would be a fun place to start. My goal (for this year) is to crochet 6 of each style. I just started the 5th style last night.
Snowflake #5
They are quick to do, and make a great take-along project. Since they are all 6-pointed snowflakes, they will be pretty easy to get starched and stretched, although I will have to set up a starching board, and I haven't yet, so none of these are truly finished.
Snowflake #4

I have a hard time saying which is my favorite snowflake as I think they are all pretty, and I like that there is a wide variety so that I can do a no-two-snowflakes-are-the-same package for each giftee. Cool, right?
Snowflake #3
When I do starch them, I will - as I did before - use a 1-1 sugar water solution to wet them through, then pin them out on a board. I have had no problem with the snowflakes I made before becoming limp, and it has been... 20 years or so since I made them (that long?!?!?). It also has the added benefit of being non-toxic for small children and pets.
Snowflake #2
I found it very helpful last time to make a pattern to pin the snowflakes on. A line for each point helped them be symetric. I also found adding a t-pin, which is a little bigger around, on one of the points a good way to make a hanger point.
Snowflake #1
For the hangers, I used a length of a fairly fine fishing line. If you make a large enough loop to go over a branch, then you don't need a hook as well, and it can pretty much disappear once you hang the snowflakes, Then they really look like they are just falling into the tree. Pretty!
A snowflake in action


Sunday, February 7, 2016

Work in Progress Disaster

Before the Christmas break, one of my co-workers and I collaborated on a couple of very cute baby afghans for two of the other coworkers who were expecting babies during the break. When we were done, and the shower over, and the presents given, I still wanted to crochet. The weather was chilly, and there is nothing like building a warm blanket to keep your lap, and then your legs warm on a chilly evening on the couch.

I picked up all sorts of orphan skeins, and parts of skeins, and thought I would make a stripey single stitch afghan, with just kind of randomly ordered strips of four rows. I have a technique where on the first row of the four, I pull the loop through at the various levels of the four rows below, and  it makes a kind of zig-zag design. Ron thought it looked so good that he asked - very sweetly - if he could have it when I was done. And would I make it LONG.

All was going swimmingly, and the afghan was over 5 feet long, when disaster struck in the form of a very sweet dog, rather prone to chewing.

The Damage. 
I was so enjoying having her at my feet, keeping me company. I don't even know what really alerted me to the possibility something could be wrong, but this is what I found. Two different colors chewed through, and one partially pulled out. AAAHHHHHH!!!

The Whole Hole
She did not get beaten, but she did figure out that I was not happy. We both pouted for a while. I think it can be mended, but it won't be the same as it was... and the thought of going that far back to do over is pretty much a stopper. Right now it is sitting in my craft room, trying to avoid further pulling out while I work up my nerve to fix it.

Sigh.

Monday, January 18, 2016

Snowman Christmas Apron

So one of the crafting challenges I've set for my self this year (if not for the next few years) is to do some Christmas Crafting. It isn't just for December you know. Or even Christmas in July! This apron is for my Mother-in-law. It was supposed to be for Christmas 2015, but I got busy at the last moment helping my brother make 9 sock monkeys for his co-workers, and 7 pairs of sleep shorts for my cousin's grandson and grand-niece and -nephews. For a while there, I thought I might have the 12 days of Christmas in sewing projects.

I had picked out some cute fabrics earlier in the fall, and had been looking forward to playing with them, so was excited to finally get the ball rolling right before school started. With a little prep work done last weekend, like putting the pockets and constructing most of the bib, I got to work on Saturday and had everything done but the waistband. Well, and all the things (on an apron, that is pretty much everything) that attaches to the waistband.

I really enjoyed deciding how to piece everything, and I really like how the apron came together. I'm not a great model, though, with great model poses. Maybe I'll have to work on that. HA!

Spoiler alert, Linda!

Christmas apron just in time for 2016
I didn't want to actually tie the ties because I wanted them freshly ironed for gifting, but I'm very pleased with this apron, if not the picture. Hi trailer, how are you? Pay no mind to the trash cans behind me...

Sunday, January 3, 2016

New Year, New Goals

 I don't want resolutions this year. I need goals. I want to have some creating goals, and some goals about blogging about the creative process, and products.

One of my goals is to blog more often, and part of what will help me blog more often is to explore what exactly it is that I want from this blog. At one point I played with the idea of becoming a professional blogger, working on getting sponsors, and worrying about how many people read my posts. But I don't really want to be some company's commercial. I don't want to have to use only the "latest and greatest" fabrics and products. I don't want to be a fabric elitist. Sometimes those bloggers do seem like that to me. Name dropping fabric lines, and longing to make that next product with the next series to drop into their favorite store.

Don't get me wrong. Those fabrics are lovely. But so are the ones I can get in the clearance bin at Joann's. Well, at least some of them are. How about that 50% off coupon? And frankly, I am just as happy to find a good use for a piece of fabric from one of my bins of fabric - some of which was inherited, and some of which came from estate sales. I would also like to try my hand at repurposing fabric from garments from thrift store or ??? who knows where. I have ideas, you know. Not all of them may amount to much. Many will fail almost completely, except for the success of trying something. Creating something. Learning.

So, one of the purposes of this blog is to continue recording my creative learning process. This is a good goal, whether one person (me) or more read it. THAT is where I would like to go with this blog. I don't want it to be a "brag" book, but more of an open-to-the-public portfolio. Whether the public is interested in looking isn't going to be my concern, because that isn't the goal. Filling the blog with experiences, learning from those experiences, enjoying those experiences and being able to look back on them and share them with those who ARE interested, THAT sounds like a lovely goal. Having said that, the opportunity to enter a creative community through this blog, would be outstanding.

So, what am I hoping to create in the coming year? I have a laundry basket of projects, just waiting to be sewn up, including a second pair of pants. I've already been doing some alteration projects for my brother, and I have to alter the pair of pants that I made recently. They are still too big at the waist.

alteration one, but they're still too big!
I have an idea to make Christmas decoration starter kits for some of the young people I know so that when they get out on their own, they have some ornaments to help them out. (And I like making Christmas decorations, so fun for me!) I have really enjoyed sewing with my cousin Roxanne, and hope we can manage to get more sewing time together this year as her health improves. It also leads me to another goal, which is to sew/craft more with others. My friend Sara loves making stuff, and we had a great time today making some mug rugs for her parents.

Sara did all the sewing on the one in her left hand!
The basic goals here? Have fun creating/making stuff. Share the fun with others. Keep a record of the fun and the learning and the creating. How can that not be a good direction?

Monday, August 17, 2015

Pants! The New Sewing Project

Yep, you heard me. I'm sewing some pants. It is a self challenge, really, as I have made myself pants many times, with varying degrees of success. Mainly, I make double knit pants with elastic waists for myself. Not terribly fitted, and but sometimes, I've made pants that just didn't turn out right. I would wear them a time or two and the fit wasn't right. Or they felt funny. Or???

I think my skills have improved over the past few years, though, so I psyched myself up to making some fitted, waist-banded, twill pants.  I got this jeans pattern several years ago, and it has been waiting patiently for me to decide that the time has come
with instructions on fitting them
I looked at the pattern, and the instructions. I watched a video class from Craftsy. I made a muslin, and then cut out two pair, one in khaki and one a very nice blue twill. I cut out some pretty pocket lining for the khaki pair, but I haven't cut into the fabric I want to use for the blue ones, so those will have to wait. As many things as I cut out over the summer, I can't believe there is still a pile to be cut.

So, Sunday, I pulled out those pants, and got started.
The pockets went together first.
Then the fly went in. 
The front of my pants!
I'm very happy with the detail sewing that is happening. I followed the suggestion from the video to to the top stitching with a stitch that goes over itself a couple times. While it isn't my first zipper, I think it may be my first fly front. 

Gosh I hope they fit right, because so far they look awesome! 

No, I don't think my head is getting too big. I know I still have the waistband to deal with, and how those never do seem to come out like I think they should. Sigh...


Monday, July 27, 2015

TIE DYE!!! Part 2

Today was the reveal day for the tie dye shirts. Eight of them. And its not like you can pull them out of the bag and hold them up to see, either, because the dye is dripping everywhere and needs to be rinsed out, and then a trip through the washer and drier before they're done.

What I like about tie dye, is that there is no failure. Your item may or may not resemble what you had in mind when you tied it up and squeezed some dye all over it, but it is always an interesting result. The dyes are pretty, so the shirts are too.

We got some interesting and entertaining results. Yes, I took pictures!
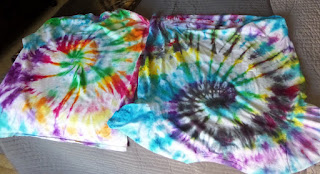
swirly!
These are our swirled shirts. The basic idea is to grab a center point on the shirt and turn until the whole thing is coiled up. You can tie or rubber band around it to hold it together, which sometimes works better than other times. The backs of both of these - shown - turned out brighter than the fronts. Not sure why. The purple along the left side of the left shirt has some interesting shapes to it, and I really like how the red and black went together on the shirt on the right.

pleat folds
I folded my shirt vertically, and Carl folded his on a diagonal. I used red and blue, while he used more of a variety. We got more white space on Carl's than expected, but it doesn't mean it isn't a cool looking shirt. I really like the effect of that red strip on the back of my shirt, and I got a surprising effect on the front, as modeled here:

Is that an arm? I don't think this is going to add any support in that area...
Raine did more of a folded technique on her shirts, one on the diagonal, and one vertical and she got some interesting results as well. Not her first time dying, but her first with artistic intent involved. She was about 4 when we tie dyed last time.

Raine's shirts
I did one of those gather up a pointy hunk of fabric and wrap rubber bands around it here and gather up another hunk over there kinds of shirts as well, and got some lovely, colorful results.
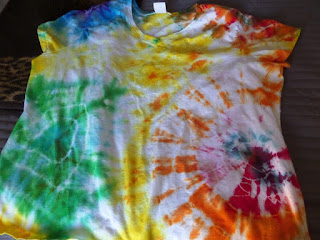
rings of color!
I really like the yellow, which I used on the parts of the shirt that weren't tied into hunks, it is bright and happy, and the orange is awesome, too.

Finally, Carl made a black dye on heather grey shirt. He said he put so much dye on it, he was afraid it was going to come out all black. Nope.
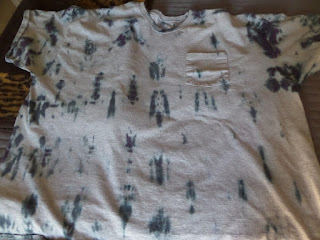
Rorschach's test anyone?
Not as much dye as you would think, but, is that a guy in a suit over there on the left side below the seam? I think he's coming in for a hug. Here's a close up of the spot just to the left of the pocket.
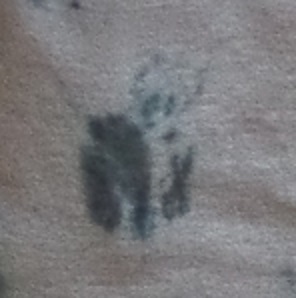
Yep, definitely a panda...
You can't plan this stuff people. Even if you don't get what you expect - or maybe even hoped for - it is still visually interesting, and THAT, my friends is success.

Sunday, July 26, 2015

TIE DYE!!! part 1

OK, first thing, let me say this. Tie dye is messy. Not the project that you can work on for a while, then pick up your camera and take a few process shots. You would need a designated photographer, and we didn't have one. So there aren't a lot of pictures in this post. Of course the shirts aren't finished yet, either...

About 8 years or so ago, we had a great time tie dying some shirts. The dye we used was from Dharma traders, and it isn't basic Rit. I think I'm wearing the last shirt from that batch. We wore them out. They got holes faster than they faded. We LOVED those shirts.

When I suggested tie dye to my family this summer, it was a go. Since the plan today was to dye, I started looking for our box of stuff last night. In the craft room. You know, with all the boxes? Yeah. My brother and I both remembered putting them in the cabinets and something about mason jars. Hmmm. There was no jar box in the cabinets, and no tie dye stuff in there in any other kind of box. There were mason jars. Yep, those I found.

So, this morning I started moving boxes and going through stuff. I gave away Raine's old play dough gear and was surprised that three of the tubs had actual, usable play dough in them. I moved this, and pawed through that. Carl came over to help.

Just when we thought we were out of luck, I lifted the lid off one. more. tub. There it was!!! Yay!

Anyone want to tie dye?
We made up the dyes, and tied up our shirts. The instructions we used before said to soak the shirts in a soda ash bath, which will help fix the dye. Then, we took them outside to play with the dyes. MESSY! Each shirt then went in a plastic bag to let the dyes set overnight.

tie dye shirts marinating
Tomorrow they get rinsed until the dye doesn't run, and then washed & dried. I can't wait to see how they come out. It may not turn out the way you thought it would, but the results will be awesome none-the-less!

Loving the colors!